
Thursday
Original Stamp Convention-San Jose, California
Tuesday
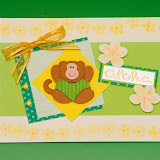
Double Happiness Panda

Using black Lasting Impressions paper is the easiest because the back is white. Emboss pieces as shown.

I glue the body of the panda down with Judikin's Trio tape. Use foam tape to adhere the head.

Emboss the tiny ears and trim close to the embossed edges. Use foam tape to adhere to the panda's face.

I used Souffle pens for the eyes, nose, and mouth.


A Great Gift


A couple of weeks ago, my friend Vicki had a block garage sale. Not everyone participates, but enough so that it makes it worthwhile to park the car and shop! If you know me, you know I hate to shop, but her neighbors are so friendly and it makes for a fun day, shopping. My first stop was at Barbara's house. She had only a few items left, but one was a treasure for me! A small orange pot with a lid, heavy as all heck and looked very much like a very expensive LeCreuset piece. It was very carefully taped together with masking tape and marked, $3.00 in Barbara's special hand. I knew I had to have it especially for making gravy. I got my wallet out to pay Barb, but she refused the money. What a great gift. I argued, she bartered. Handmade cards for the wonderful gravy pot. So, here are two of those "bartered" cards. Thanks Vicki and Barbara! What a fun day.
Wednesday
Rolling (Penny) Card

You will need cardstock, Pop Dots, penny, foam tape, craft knife and a straight edge. I use the Pop Dots made by Plaid that are 1/2" by 1/8" thick. Don't try cutting out a dot by hand because the edges of the dot has to be smooth to roll correctly.

Figure out where you would like your image to roll. Position the slot so the image will roll within the boundaries of your card. Now draw a "slot" the width of your Pop Dot (1/2") and round the ends so it looks finished. Carefully cut the slot with an Exacto as smoothly as you can. I use a metal straight edge as a guide and stop short of the ends and then freehand cut the rounded part.

Cut another piece of cardstock the width just below the cut edge of the slot to the bottom of your card. This piece will not show so it can be any scrap paper. This will be a support piece for the "rolling penny." I find that using this support backing helps the penny roll more consistently. You can also attach the support piece to the front of your card if you want, let's say a blue horizon and a green foundation. Cut blue cardstock for your slot and add a green support piece to the front.

You can't tell by the picture but the support backing is just below the slot. Glue the support backing onto the back of the slotted piece.

Attach foam tape to the back of the slotted piece. Note the placement of the tape. Don't get too close to the slot! This will stop the penny from rolling. You want to be generous with the tape too because the slotted front of the card will collapse if you don't and will not leave room for the penny to roll. Adhere the Pop Dot to the middle of your penny and lay the penny down in the slot as shown. I find that putting the Pop Dot right in the center is the best. Trying to give you lots of hints from the mistakes I made which were plenty!
 Cut out an image and adhere to the penny. Check to see if it rolls correctly. Sometimes I have to use scissors to open up the slot. Decorate the rest of your card making sure that any raised images aren't in the way of your rolling image or else it will get caught and stop! Using images that have their hands up is so cute. Looks like they are doing cartwheels. I have used Tiki's penguins, monkeys and her girls. I haven't finished this card yet, but will post it soon.

All finished! Fast and easy. Tilt the card from side to side and Jelli does cartwheels.
If the above confuses you completely, email me and I will try to answer your questions. dtakakuwa at gmail dot com
Sunday
Happy Birthday Card

Tuesday
Demo Cards 2006
 |
| Taj Demo Cards 2006 Jon |
Saturday
Hawaiian Princess Layering Tutorial

I embossed the image onto flesh toned paper. I traced the lines in ink so it would show up better in the photo. It is not necessary to emboss every part of the image, because this is the base in which you will layer her face-arms, hair, skirt, lei and haku. Next, I cut the base out close to the embossed lines.

Emboss the face and arms again on flesh toned paper and trace in some guidelines for hair placement. I inked in her eyes and nose and used chalk for her lips and cheeks.

I used Twinkling H2O potted paints on regular white cardstock for her skirt, hair, lei and haku. After embossing, cut all the pieces out. You can see in the picture that I embossed an extra set of legs, but in the end didn't use them. I cut inbetween the individual grass pieces because I think it looks nicer, but you can either use green paper or paint the whole skirt green. Note the cutting of the skirt includes part of the arms which makes for easier placement and insures 100% coverage. Now for the layering.


I use foam tape to place her face and arms on the base. The dimension looks nicer.

I used foam tape on her lei also.

Place her hair, matching the embossed lines on the base and face using foam tape.


All done! Wasn't that fun, easy and cute?